Apple Laptop Hard Drive Removal Instructions
Removing the hard drive or SSD from your Mac laptop doesn’t necessarily mean a trip to Apple Store. You can do it yourself for the most of MAC laptops. Before making decision to grab a screwdriver, find out and bear in mind few facts about your laptop. To find out the storage type or the generation and family name for a particular model, read the code number on the laptop case. It starts with an 'A...'. That code will also help you to answer the question how easy or difficult is to remove the drive from your Mac computer and how to proceed.
Removing the storage drive (HDD or SSD) from most of Apple laptops are pretty easy process, however the older models require certain technical experience and step-by-step instructions.
We have divided all Mac laptops into two groups. The first group includes all laptops with easy access to storage drive. The second group contains Macintosh models with complicated drive removal instruction.
First Group - Easy Drive Removal laptop case design
- MacBook ( 2006-2011), most with A1181 code printed on the case.
- MacBook Pro (2008-2012) Second generation - aluminum Unibody: Case Models A1286 (15"), A1286 (15"), A1297 (17"), A1278 (13"), A1286 (15"), A1297 (17"), A1278 (13"), A1286 (15")
- MacBook Pro Retina 2012-2015 (Third generation): A1398 (15"), A1425 (13"), A1425 (13"), A1502 (13"), A1502 (13"), A1398 (15"), contains SSD with interfaces Mini-SATA, PCIe 2.0, or PCIe 3.0
- MacBook Pro Fourth generation (Touch Bar) 2016+: Intel Core i5 for models A1708 and A1706, and Core i5 for A1707, all with SSD storage.
- MacBook Air 2010-2015 A1370 (11"), A1369 (13"), A1465 (11"), A1466 (13"); all with SSD
Second (Complicated Drive Removal) Group contains
- 2003-2006 PowerBook G4 Aluminum
- 2006-2008 MacBook Pro (First generation): Model number A1150 (15"), A1151 (17"), A1211 (15"), A1212 (17"), A1226 15", A1229 (17"), A1260 (15"), A1261 (17"), A1261
- 2008-2009 MacBook Air A1237, A1304 (also called 'first and second generation MacBook Air models)
Few Advises before you Start
Battery: For precautionary purposes, we advise that you disconnect the battery connector from the logic board to avoid any electrical discharge. On MacBook Air - carefully slide out the battery connector of the socket. Other models may come with other type of connector, the vertical one. Use a flat end of a spudger or other tool that has a wide flat-head screwdriver-like end that extends as a wedge to lift the battery connector up out of its socket on the logic board.
Cables handling: The ribbon cables are very fragile. Be especially careful when disconnecting the cable from the logic board.
Tools: You may need couple of screwdrivers and, for some models, a prying tool. You may work with any laptop if you have a Phillips #00 (for most models), a Pentalobe screwdriver (for MacBook Air), Torx T5 (for MacBook Air), Torx T8, a 1.5 mm hex screwdriver and a coin for PowerBook G4.
Generalized Drive removing instruction for the Apple laptop from group one (Easy)
The process of removing SSD or HDD from computer in First Group is incredibly simple: you generally use a screwdriver to remove few screws from the laptop’s bottom to access the data storage device. The important thing to know is that the process is similar for all laptops in group one. So,
- Flip your Mac over, and locate the screw holes. Number of screws securing the bottom varies from model to model (eight or ten for most laptops)
- Pry the bottom off of your computer. It should come off fairly easily, without any undue force.
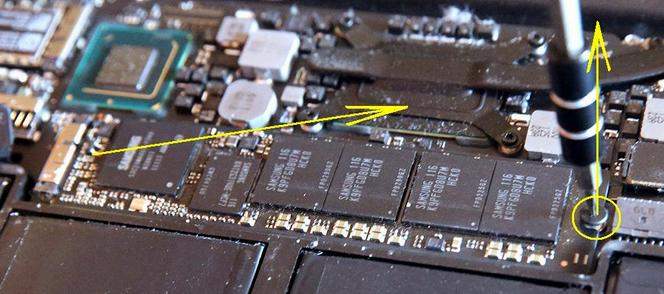
- Locate the hard drive or SSD. The drive may be held in place by a little bracket. Remove the screws holding the drive or bracket. Next, gently remove the drive. You may need to tilt the drive to release out of the chassis and remove the ribbon cable connecting it to the notebook. For the hard drives, you may found four small metal posts that must be unscrewed before sending to us.
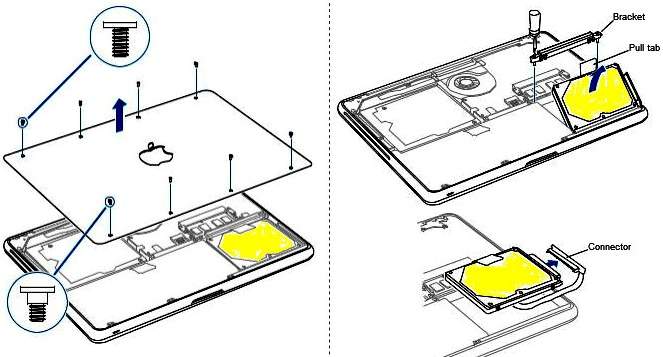
Here is an extraction guide for a typical SSD on the picture below. (Photo: MacBook Air inside)
If you laptop from the second group (Complicated)
Second Group comprises the Apple laptops with difficult and complicated access to the hard drive or SSD. The directions are far more complex for old Mac models. You will have to pull about two dozen external and internal screws, remove multiple cables, remove the keyboard and pry the upper part of the case before reaching the hard drive. If you have one of these old machines, you’re probably best off seeking the services of a third-party Mac repair shop to remove the drive, or ship the whole unit to our lab.
If you still are determined to do it in your house, you may find on the web the manuals made by MAC enthusiasts, with detailed instructions how to take apart the whole computer to reach the hard drive.